Before getting serious with a headless Raspberry, it´s a good idea to set up a folder to be uses as network share in Windows. That is, if you are a Windows user. If you are a Linux user, i expect that you know how to reach your Raspberry. In that case, you would not even read my N00b posts, i guess 😉
Install Samba on your Raspberry Pi
Make sure you update the packages before installing Samba:
sudo apt-get update
sudo apt-get upgrade
sudo apt-get install samba samba-common-bin
Configuration
As usual, all the configuration happens in one file:
sudo nano /etc/samba/smb.conf
First, search for the line “security = user” and uncomment it, so the user has to authenticate himself to reach the Samba shares.
Scroll down to the very last line and add the following:
[data]
comment = Raspberry Data Folder
path = /home/data
writeable = yes
Of course you have to create that folder on your Raspberry Pi, and give it write permissions for later:
sudo mkdir /home/data
sudo chmod 0777 /home/data
Alright, now you got a writeable Folder already. There are many more options, if you´re interested in the whole deal just check out the official docs: http://www.samba.org/samba/docs/
Especially those Links have been very useful to me:
Samba User
Because we set the security parameter to “user”, we need a valid user authentication when connecting to the Samba share. Instead of creating a fresh user, we can just use the default one (“pi“) for Samba:
sudo smbpasswd -a pi
This creates a Samba user and requires a password. It´s a good idea to use a different password for the Samba user, of course.
Restart Samba
After changing the configuration, you can either reboot your Raspberry Pi or just restart Samba and test the configuration afterwards:
sudo service smbd restart
sudo testparm -s
That´s it for the Raspberry, time to move over to Windows!
Mount in Windows
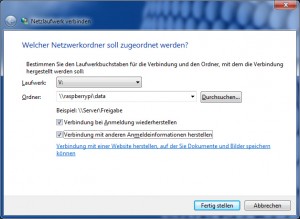
As long as everything above is set up corretly, this is the easiest part. Open the File Explorer and hit the button to connect a network drive. Sorry that the screenshot is in german, just fill in the data like that:

You will get asked for authorization data, use “pi” and the Samba password you set before.
From now on you can move files to and from the Raspberry in a very easy way:
